
New versions: 2023.7, 2023.8 and 2023.9!
In this overview, we’d like to tell you about the innovations and improvements we’ve made to our products for you in the third quarter of 2023.
BusinessLine
ProductionLine
ContentLine
BusinessLine
AdSuite
New field “Percentage tariff deviation”
A new field „Rate_deviation“ deviation „(%)“ shows the percentage deviation of the net price from the regular tariff price for each order item.
Example: With a regular tariff price of 848,- € and a net price of 684,76 € reduced due to discounts, an absolute Rate_deviation 163,24 € would result. In future, an additional percentage tariff Rate_deviation -163.24 € / 848, € = 19.25 % will be shown.
The new field is available for order items both in the display within orders and in lists of order items, reports and workflows for AdSuiteEnterprise and AdSuiteMarket.
Additionally, the new field will be included in the export processes via OrderServer and via Web Service.


Selecting mail addresses for sending receipts
If email addresses are added in AdSuite Client or Market in the sample_items tab using the „Add custom addresses addresses“ function, a dialog now appears that allows you to select emails. This applies to both client and order.


AI support: Fill criteria set from ad text
In the future, AdSuiteMarket will be successively supplemented with functionalities that allow simplifying the way of working through support on the part of Artificial Intelligence.
Important notes:
- All AI extensions only affect the browser-based user interface AdSuiteMarket; they are not available in AdSuiteEnterprise.
- The prerequisite for using the AI extensions is an API key for the AI models of the OpenAI platform.
- Privacy notice: When using this function, the name components of the currently opened collective as well as the designations of the industries configured in AdSuite are passed on to the OpenAI platform.
Filling a criteria set from a print ad text is now available as another AI module.
More information on administration and use in ASM as well as ASE can be found in our DokuWiki.
Note in ASM in case of ambiguous price configuration
Unlike in ASE, there was no information in ASM in case of an ambiguous definition of tariff prices. This behavior has now been changed. In the future a hint appears that this case has occurred.
The allowed tariff prices and the selected tariff price are listed.

Check on contact partner assignment for selected status
When editing the order and customer status you can now set whether a check on contact person assignment per status should be done. This function can be limited to customer types:

If this option is activated it will be checked when saving a customer or an order with this status, whether an contact person in assigned. If not a warning will be displayed.
HubSpot interface: Trigger status change in AdSuite offer
By changing defined deal pipeline phases in HubSpot, a status change of the assigned AdSuite offer can be triggered. The following configurations are required for this:
Configuration in AdSuite-Setup
- Create order status transition for module
offerAcceptedInHubSpot⇒ Offer after order - Create order status transition for module
offerRejectedInHubSpot⇒ Offer after “Offer rejected”.
Configuration in HubSpot
Addition of webhooks for the public app (hub “developer base alfa Media Partner”)

The “target URL” is to be entered according to the following scheme: <SERVER>/RESTUNSEC/customReport/hubspotEvent?contextShortname=<SHORTNAME_CONTEXT> – “SERVER” is to be replaced by the URL for the AdSuite web services of the target customer system (this must be publicly available for external calls from HubSpot for this purpose), “SHORTNAME_CONTEXT” by the short name of the context.
Setting relevant pipeline phases (deal properties in the customer hub)


For the phases “Won” / “Lost” require user specification in the Boolean field (“Convert offer in ASE to order”):

The previously deposited web service checks which answer was given for the deal and, if necessary, initiates a status transition of the offer.
Provision of the web service
- Open AdSuiteSetup in the customer system and navigate to the “Basic data / Field extension & scripts” area.
- Create a new extension with the name “hubspotEvent” and extension type “Web Service” with the following script code:
import de.alfa.openMedia.adSuite.businessObjects.utils.HubspotSyncService;
return HubspotSyncService.getFromHubspot(DatabaseQueryCache.getContext(parameter.map.contextShortname), s -> s.handleHubSpotWebhookEvent(parameter.map.results))
HubSpot interface: Synchronisation of order confirmations
The process for synchronising customers and orders from AdSuiteMarket to HubSpot has been extended to include the transfer of order confirmations. This means that every order confirmation created by a user in AdSuite is now automatically transferred to the associated HubSpot deal.
Important notes:
- Only order confirmations of AdSuite orders that have already been synced between AdSuite and HubSpot will be considered.
- Each order confirmation is embedded in a deal note in HubSpot.
- The deal note contains the PDF file of the order confirmation and a text containing the creation date and the creation user of the order confirmation.
The prerequisite is a corresponding configuration in the HubSpot publisher settings:

Advertiser information for agency orders in progress view
For agency orders, the AdSuiteMarket history view now offers a tooltip with the full name of the advertiser:

Scrolling behaviour in portals (e.g. customer/order portal)
AdSuiteMarket is based at key points of the user interface on the combination of a toolbar with information blocks that are arranged in tiles below the toolbar. In order to be able to select the actions of the toolbar even when scrolling to information in the lower area of the portal, the toolbar now remains fixed while scrolling.
Series function for new online and free positions in AdSuiteMarket
If you have selected the unit „days“, „weeks“ or „months“ when creating new online and free positions in AdSuiteMarket or additionally „CPM“ or „cost-per-click“ for online, a new button for entering a series now appears to the right of the „to-date“(analog to AdSuiteEnterprise):


This button is not selectable if multiple „from-dates“ have already been selected (see multiple online positions or multiple free positions)
If this button is pressed, a small dialog appears where you can specify how many positions should be created and for „CPM“ or „cost-per-click“ additionally their period:

If this dialogue is confirmed with “Apply”, only a short info about the series is displayed instead of the input fields for the dates and the “Series” button turns red:
![]()
If you click on “Apply” in the title bar, the specified number of consecutive positions will be created.
More options for motif selection for new print positions
Until now, when creating new print positions in AdSuiteMarket, a new production_detail was always created or an existing production_detail of the same order could be used.
Now, similar to replacing motifs, it is also possible for new print positions to copy a production_detail from another order or to use a copy of an existing motif for the new order positions. In addition, a new copy can also be created for each new publication day.

In detail the following actions are possible:
- „new motif“: After „Accept“, a new motif can be designed, which will be assigned to all new order items.
- If „Create a copy“ is also selected, this motif will be copied and assigned for each additional publication day with the specified copy profile.
- „other motif from current order“:

- An existing motif can be selected below. Optionally, this can also be copied once or for each new publication day.
The text of the „Accept button“ changes to „Create position with motif {motif}“. - „copy a motif from another order“: As soon as this action is selected or the „Ad Selection“ button is pressed, the search dialog for selecting a motif opens, in which the service type and the customer number of the orderer are pre-filled:

The selected motifs are displayed in the „motif dialog“ below (see image at the very top). The order number is also displayed (highlighted in yellow above). „Create a copy“ is switched on automatically and cannot be changed.
The text of the „Accept button“ changes to „Create position with motif {order number} {motif}“.
As long as no motif has been selected for the actions „other motif from current order“ and „copy a motif from another order“, a new motif will be created.
In the case of motifs, that do not match the selected production structure, “The motif is not permitted” is displayed below. If you click on this text, you can find out why.
Invoice cancellation/immediate billing of a complete invoice in AdSuiteMarket
The functions for cancelling and recalculating a complete invoice (which may also include several orders) have now been made available in AdSuiteMarket in the same way as the function known from AdSuiteEnterprise. For this purpose, the toolbar menu for a selected invoice in the table of invoices for a customer – depending on a corresponding authorisation – has been extended to include the following actions:

- CancelInvoice (authorization
invoiceCancellation): Sets the billing status to Canceled in all affected order items. A cancellation is created as part of a subsequent nightly billing or an immediate billing document for the Invoice. - CorrectInvoice (authorization
invoiceCorrection): Sets the billing status to To Be Billed in all affected order items. New documents are created as part of a subsequent nightly billing billing or an immediate billing document for the Invoice. - Immediate billing (authorization
invoiceInstantBilling): Performs an immediate billing for all order items affected by the Invoice, taking into account their current status. The new documents created as part of this process are subsequently part of the customer’s invoice list and can be retrieved via the rule route (download or download as copy). In the context of immediate invoicing, the authorizationchangeBookingDate or changeInvoiceDate and ignoreMinimumInvoiceDate are also evaluated.

AI support for sector allocation to AdHoc collectives
In the future, AdSuiteMarket will be successively supplemented with functionalities that allow simplifying the way of working through support on the part of Artificial Intelligence.
Important notes:
- All AI enhancements only affect the browser-based user interface AdSuiteMarket; they are not available in AdSuiteEnterprise.
- The prerequisite for using the AI extensions is an API key for the AI models of the OpenAI platform.
- Privacy notice: When using this function, the name components of the currently opened collective as well as the designations of the industries configured in AdSuite are passed on to the OpenAI platform.
As an additional AI module, an automated suggestion for the industries of a collective based on its name components is now available.
For this purpose, an OpenAI API key must first be stored in the new „AI support“ tab of the client settings. The AI support of the industry determination for theme_supplement must also be activated separately.
In addition, a chat model can be defined. If this is not done, gpt-3.5-turbo will be used.
The maximum number of industries suggested by the AI can be defined in the range from 1 to 999.

Manual determination
For manual determination, the new function Industry determination using AI is available in the menu of the sign on collective registration.
This determines suitable industries based on the short name, the local name and the local description. The industries found are directly assigned to the theme supplement. They are selected in the table of the tab Industries, which is called automatically afterwards, and can be edited.
Plausi check when saving
If the client plausi check At least one business_line for theme_supplement collectives is set to warning or error and no industries have been assigned yet, then ASM automatically performs an industry determination using AI.

If the AI does not find any matching industries, then a warning or error message appears with the option to assign industries manually.
In the other case, the information about the number appears, moreover, the first matching industries found are listed.
The options available for selection are automatic assignment of the suggested industries and manual assignment. In both cases, saving is canceled and the user is taken to the Industries tab. If the plausibility check was defined as a warning, the message can also be ignored as usual with Accept.
Synchronise publisher’s notes with period in calendar
The publisher’s calendar now always shows those notes that are or were valid in the selected period.
Copy workflows
Workflows can now be copied by the user in ASE and ASM as soon as the logged-in user has the ‘CopyWorkflows’ right. It is possible to create the copy for the same context or for another context. For copying for another context, it is necessary that the user also has the right for the other context.
Cross-context workflows
Analogous to the report configuration (cross-context reports), workflows can now be marked as “cross-context”. The results are then no longer limited to objects of the context for which the workflow was created. The configuration is available in ASE as well as in ASM.
It remains the case that the workflow with its results is only visible in the context for which it was defined. In addition, all automatic actions configured for the elements are carried out from the perspective of the workflow context.
Action pattern – Button extended by “Close action?
A button on the action pattern has been extended by the option Close action?
Previously, the action was automatically closed each time a defined button was pressed. Afterwards, it could no longer be edited by the end customer.
The new option now allows the action to be called up again later and edited.

End material requisition when last document has been uploaded
A material requisition can now be ended automatically without a mouse click on the corresponding button when the last document has been uploaded.
After each completed upload, the user is asked whether further documents are to be uploaded.

If this answer is No, the functionality provided by a button with the option Close action? is carried out and the action is closed.
If the answer is Yes, another upload can take place. The file selection box must be opened manually by mouse click. Automatic activation is not possible.
Customer status in the task bar
The customer status is now displayed in the customer area analogous to orders/motives in the top right of the task bar and can be changed there. In addition, it is possible to define a colour for the display in ASM in the administration of the customer statuses (coloured display of statuses in ASM).

Display dashboard key figures in colour
The colour settings of the target achievement is now no longer dependent on the ‘As Graph’ option, but can now also be used for the metric itself.


Display OrderServer log entries more comfortably
Three improvements have been made to the display of log entries for an OrderServer or OrderServer process.
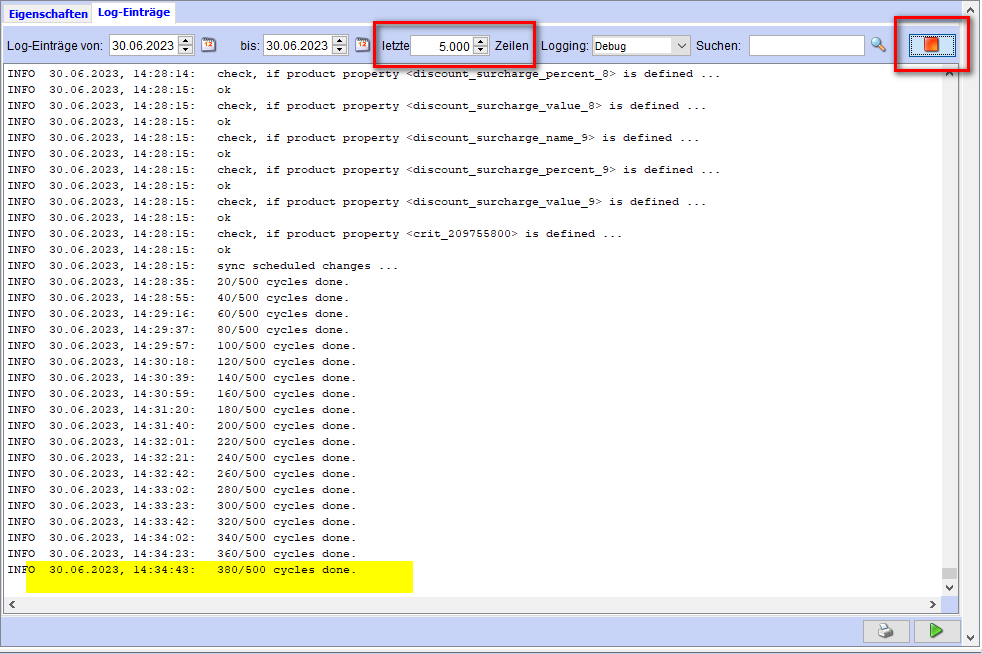
- The reading of the log entries has been accelerated.
- Only the last n lines can now be displayed. The last 5000 lines are preset. If all lines are to be displayed, “0 lines” must be entered.
- If “until” is set to today’s date or a more recent date and the button at the top right is pressed, this button changes to “stop”. This indicates that current log entries are now automatically reloaded every 5 seconds.
If you click in the area of the last 50 characters (marked yellow in the picture above), the system always scrolls down so that the new entries can also be seen.
Clicking on “Stop” stops the automatic update, the button changes back to Refresh button and a new search can be carried out again.
Read-Only Display of Consolidated Financial Statements for Subsidiaries
In ASM, the financial statements of group subsidiaries are displayed in the preview and in the detail view of the financial statement portlet. The presentation in the detailed view is in read-only mode, recognisable by the grey background colour.

AI support for sector allocation
See also: AI support for keyword identification
In the future, AdSuiteMarket will be successively supplemented with functionalities that enable a simplification of the working method through support on the part of artificial intelligence.
Important information:
All AI extensions only affect the browser-based user interface AdSuiteMarket; they are not available in AdSuiteEnterprise.
The prerequisite for using the AI extensions is an API key for the AI models of the OpenAI platform.
Data protection notice: When using this function, the name components of the currently opened customer as well as the designations of the sectors configured in AdSuite are passed on to the OpenAI platform.
As the first AI module, an automated suggestion for the industry of a customer based on its name components is now available.
To do this, an OpenAI API key must first be stored in the new “AI support” tab of the client settings. The AI support of the industry determination must also be activated separately:

The automatic AI-supported branch determination works in the following two situations.
1. if, when saving a company customer, the plausibility check finds that no sector has yet been entered for the customer, a suitable sector is automatically selected from those stored in the setup programme and offered as an AI suggestion which the user can accept. Of course, the previous option of simply selecting from the existing sectors is still available:

2. when manually assigning branches for a customer who does not yet have a branch, an AI-supported suggestion can be retrieved via the “AI suggestion” button:

Notes:
- Costs are incurred when generating a sector proposal. At the moment, these costs are between approx. 0.01$ and 0.03$ per generated proposal, depending on the number of industries stored.
- A language model (currently OpenAI “GPT-3.5-Turbo”) is used for the generation, the results of which are not completely deterministic. This means that the same initial data at different points in time can result in different sector suggestions.
- The time required to determine a sector suggestion varies not only depending on the number of sectors stored, but also depends on the load on the OpenAI web services used. Therefore, when using this function, waiting times of several seconds may occur in the dialogue.
Customer search via collectives
The new customer filter “Collective interest” allows the selection of a collective with future publication dates and existing industry assignments. The search then returns those customers whose industry assignments have a non-empty intersection with the industries of the selected collective.

AI support for keyword identification
See also: AI support for industry assignment
A new option for AI support in the determination of ad keywords is available in the client settings:

When entering an ad motif in AdSuiteMarket, an “AI suggestion” function is available after activating this option, via which an automatic AI-generated summary can be generated on the basis of the Stylo ad text or, in the case of full templates, the raw text and transferred to the keyword:


If it is also configured in the publisher’s settings that a keyword is required for a display, then if the corresponding plausibility check is activated and a keyword is missing from full templates, an AI suggestion is automatically provided on the basis of the raw text information, which the editor can accept. Alternatively, it is still possible to enter the keyword manually:

Notes:
- Costs are incurred when generating a keyword. At the moment, depending on the length of the ad text or the raw text, these costs are between approx. 0.0001$ and 0.001$ per generated suggestion.
- For the generation, a language model (currently OpenAI “GPT-3.5-Turbo”) is used whose results are not completely deterministic. This means that the same initial data at different points in time can result in different keyword suggestions.
- Data protection notice: When using this function, the current ad (raw) text is forwarded to the OpenAI platform. This text may also contain personal data.
Stylo
OpenAI support in Stylo
Detailed information on how to use AI functions in Stylo can be found in our guide in the DokuWiki.
New image formats: WEBP, HEIC, JPEG XL, AVIF
The following image formats can be processed in Stylo:
- JPG
- PNG
- GIF
- TIFF
- PSD
- PDF
- JPEG XL
- AVIF
- HEIC
- WEBP
Which image formats can be used by the users is generally defined in the administration via the permitted image formats. The configuration in the rights groups can be used to specify which image formats can be uploaded.
New display form of saying pools
Saying pools can be used to make text fragments available for insertion into the text. They are often used for the eponymous sayings used in funeral announcements. The configuration of the saying pools is done via the properties of the text box.
Information on creating and configuring saying pools can be found here.
Sayings are displayed in a flying palette that is also searchable. The saying gallery is called up via the context menu or via a small button in the lower right corner of the text frame.
![]()
![]()
By clicking on the icon, the available pools are displayed.

![]()
After selecting the desired spell pool, the contents of the pool are displayed.

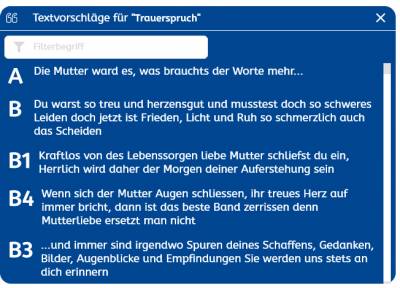
With one click, the desired saying can be selected.
You can search within the sayings using the search mask on the palette.
Automatic creation of picture frames (via the floating toolbox)
This variant of the flying toolbox is displayed when you have selected a picture frame. The box contains some additional elements that are image-specific.
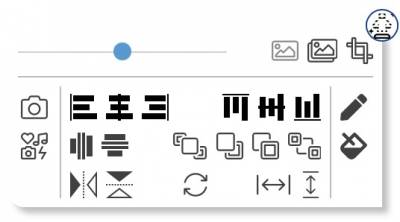
Adjusting the size of objects (via the Floating Toolbox)
If you want to adjust the width or height of objects, you can do this with this function. First select the objects that are to be adjusted before you finally select the object that is to specify the size.
![]()
Rotating objects in 90 degree steps (via the Floating Toolbox)
Graphic objects can be rotated in 90 degree steps. Independently of this, you can rotate in finer steps directly on the object via the Rotate property or via the Properties dialogue.

Mirroring graphic objects (via the Floating Toolbox)
Images and other graphic objects can be mirrored with this function. However, this does not affect the content of text frames.

New interface is now the default
From version 2023.7, the new interface will be the default in Stylo and there are two ways for you to get back to the old interface. However, the old interface will be removed in the course of 2023 and will not be available then.
Horizontal scaling on character level
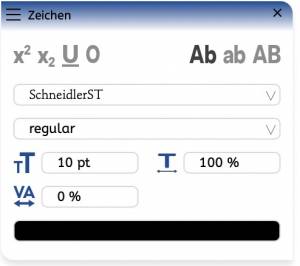
If the palette is activated, a number of functions are available with which you can design text. If you have called up the character palette, the floating toolbox is hidden.
Icon bar
Font family: The fonts that are allowed in the display are shown – depending on the font pool that is selected. In the field you can filter for the desired fonts.
Font style: Here you can select the styles belonging to a font family.
- Specify the desired font size. The configured minimum and maximum restrictions for the value apply.
- You can reduce the scaling of the font. Values between 60% and 100% are allowed.
- Positive and negative values can be entered in the field to lock or undercut selected text.
The lowest field shows the current font colour. Clicking on the button opens a dialogue where you can change the colour settings.
Further development
You can follow the progress of our Stylo development in our Stylo videos: YouTube-Playlist.
ProductionLine
ProductAdmin
Entry and modification of PrintLayout page headers
The entry and editing of PrintLayout page headers has been transferred from the format system to ProductAdmin.
Prerequisites:
- in OpenMedia and the server administration for PrintLayout the same access data to the ActiveMQueue must be set up.
- In ProductAdmin, access to the web interface of PrintLayout must be entered via the parameter administration under General Parameters → Global → Editors → PrintLayout.
For entering and changing PrintLayout page headers, a new entry called Page headers has been created under the newspaper objects, via which the directory of the page header master data can be viewed. In the context menu of the new directory the functions New in PrintLayout for entering and Edit in PrintLayout for changing can be used. For both functions it is necessary that the PrintLayout application is started.
New in PrintLayout: The dialogue Page Header is opened in which the paper format and the grid, which is determined via booking unit, partial page type and department / main runic, with which PrintLayout is to work, are specified. After creation, a dialogue appears in PrintLayout in which you select the article layout for the new page header. The Name field must be filled in with a new page header name (note: only 16 characters are possible).
Then the layout and filling of the page header article according to the desired ideas begins. Finally, the layout mode must be closed (with saving), whereupon another Page Header dialogue opens in ProductAdmin. In this dialogue, further data for the use of the page header in Productplanner can be adjusted.
Finally, the new page header must be entered in the desired sales issues.
Edit in PrintLayout: The selected page header is opened in PrintLayout and can be changed there according to the desired ideas. After completing the work, the layout display must be closed and the changed page header data saved in the database via ProductAdmin.
After both actions, ProductPlanner must be restarted so that the changes in the control data are loaded from the database.
A detailed description can be found in the DokuWiki under Capturing and editing page headers via alfa PrintLayout.
Deactivate duplicate monitoring for a department
Assign page headers to sales issues
The new Edit page headers directory can be used to assign page headers to issues.
A detailed description can be found in the Dokuwiki under Assigning page headers to the distribution issues.
ProductPlanner
View PP Text overlay
Element (filler) does not move into the background
Rotation of advertisements
Via the new pop-up dialogue “Rotate” (accessible via Menu Bar → View → Rotate in Graphic View), a rotation can be assigned to advertisements. The specification in the “Angle” dialogue box is in degrees.
Positive values assign a clockwise rotation to a display. Negative values mean a counterclockwise rotation.
The function is described in more detail under: Rotate
WebTracker
Display of the short names of the newspapers
Until now, only the name of the newspaper was displayed in the dialogues.
Now the property webtracker.search.show.publication.longname can be used to define whether the designation or name of the newspaper is to be displayed.
Menu “Show elements” can be hidden
The Show Elements menu can now be hidden with the property webtracker.right.element.options.
ContentLine
PrintLayout
Small bug fixes and error corrections.
EditorialOrganiser
Simplification of the selection of users/groups in the task dialogue.
In the task dialogue, it is no longer necessary to deselect the currently selected agent before selecting an agent group. Instead, selecting a group automatically deletes the current agent.
New block type in the editor: HTML code blocks
There is now a new type of content block in the article editor: the HTML code block. Any content can be entered here (such as HTML code), which is then displayed in a small preview on the left-hand side, as far as it fits there. This content is displayed directly in the div element of this block when it is exported, without a comprehensive iFrame or similar.
Article editor on 4:3 monitors: right sidebar now displaces the editor
To improve the view of the article editor on small monitors, unfolding the right sidebar now displaces the article, if necessary, so that these two areas no longer overlap. When the sidebar with the metadata is collapsed again, the article expands back to its original width.
With the sidebar on the left side, however, there is still an overlay when expanding. However, it is still possible to recognise the insertion marks for pictures or other elements and to place elements in the article.
Archived content can no longer be edited
If a content has been archived in the Alfa Digital Asset Manager, it is not possible to edit its metadata in the Editorial Organiser (image description, department, etc.). Manipulating the image content (pixelating, rotating, cropping, etc.) is also not possible with such images. If editing is necessary, an image variant must be created for this purpose.
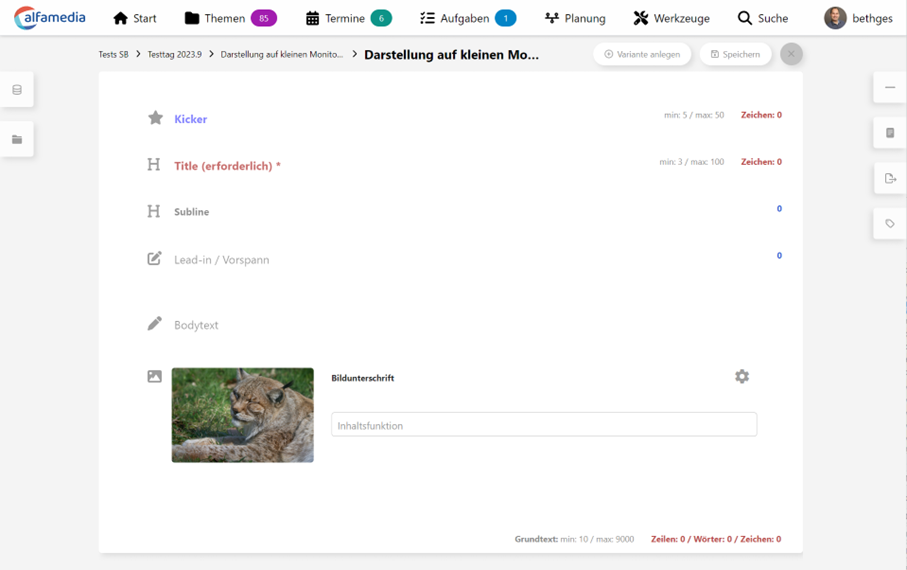
However, placement in articles and editing of the article-specific caption is possible as before.
Note: Atlas version 2023.8 is required for this.
Deletion of blocks in the editor secured
In order to prevent users from accidentally clicking on the bin icon in the article editor and thus discarding a block that they did not want to discard, a dialogue is now displayed in which the deletion of the block must be confirmed.
Extensions for the Exporter to WordPress
The WordPress Exporter has been extended by a mapping to convert EditorialOrganiser’s internal HTML into an optimised HTML for WordPress.
Extensions for the Exporter to WordPress
The WordPress Exporter was extended by a mapping to convert the internal HTML EditorialOrganisers into an optimised HTML for WordPress.
Theme label selectable when creating a theme
Up to now, theme labels could only be set on the planning boards for the planning cards. Now these can also be set in the normal theme creation and when creating planning maps.
In addition, it is now also possible to filter content by topic labels in the topic/appointment search.
Picture galleries can be assigned a department again
Independent of a planned export, picture galleries can again be assigned a department.
New element for planning maps: Department
In addition to the colour label for the department, it is now also possible to visualise the department on a planning map in a coloured pill with its name. This is especially interesting for planning tables where the display of the departments in separate lines has been deactivated.
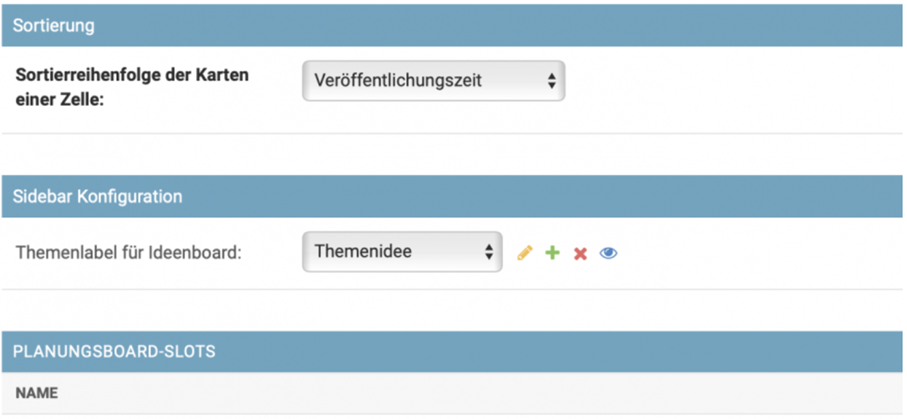
Deposit a tag on the planning board
You can now save one of the theme labels as the default for a planning board. This label is then displayed as an entry in the sidebar of the planning board and lists all themes with this theme that have not yet been scheduled. The label is automatically assigned to all themes that are created via the dialogue for creating theme ideas.
Configuration options for the “Create new planning” dialogue
It is now possible, depending on the use case and workflow, to configure the dialogue for creating a new planning board. The configuration for the selection of the fields for the main topic, the content function and the playout schedule is done on the planning board level and can thus differ from planning board to planning board so that one can map different workflows in an organisation.
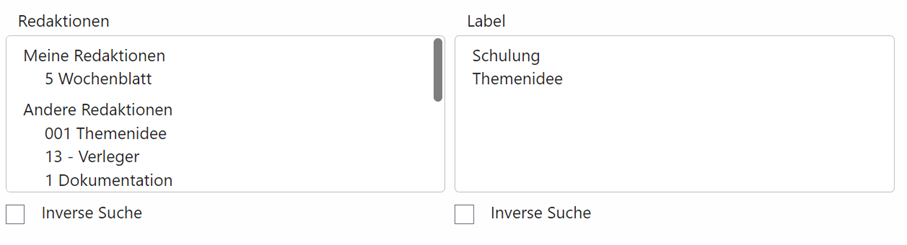
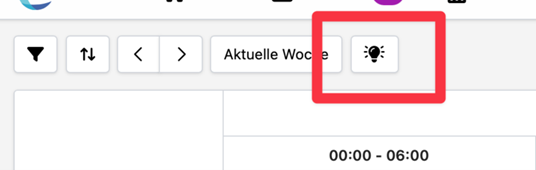
Sidebar for the planning boards
A sidebar has been added to the planning boards to allow access to the theme ideas, the user’s favourites or search profiles for themes and articles. The items listed there can be dragged and dropped into the planning board for planning. In the case of a topic, an article is created in that topic linked to the channel, department and date corresponding to the cell in the planning board. If an article is dragged and dropped into the planning board, an article variant is scheduled on that date for the channel and the department.
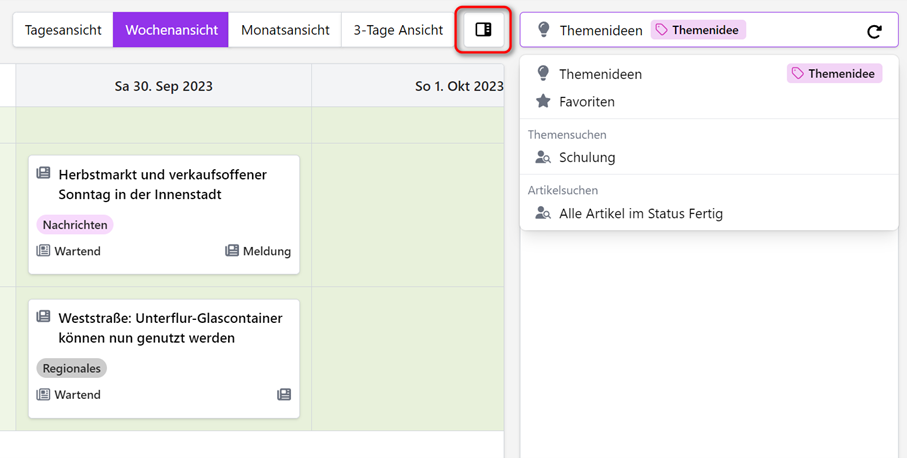
Dialogue for theme ideas
If a theme label for theme ideas has been configured for a planning board (see Deposit Tag on Planning Board), there is a new button in the navigation bar of the planning board for creating theme ideas. When clicked, a compact dialogue opens that contains only the essential fields for a theme idea. The theme label for the theme idea does not have to be set manually; the dialogue does this automatically in the background.
The investment dialogue is reduced to the name and description to enable quick and intuitive entry.
The themes created can then be scheduled via the new sidebar. The themes disappear from the sidebar as soon as they have been scheduled.
Deleting theme content that has been used several times
If an element from Atlas was imported several times into the EO (into different themes), deleting one of these elements previously resulted in the element also being marked for deletion in Atlas. This meant that all references in all themes in the EO that referred to this element were marked for deletion.
This behaviour has now been changed: If such an item is deleted in EO, only that one item in EO is marked for deletion. The marking is not passed on to Atlas and thus to the other references within the EO. Only when the last reference present in the EO is also marked for deletion is the marking reported to Atlas.
Images can now be omitted during content transfer
When transferring content, there is now an additional button “Transfer without attachments”. This allows only texts to be transferred to the selected variants, but pictures, videos, etc. to be omitted.
Alice can also create summaries
Existing Alice functions have been further improved. In addition, there is now the function “Create bullet point summary” for text blocks. This is very helpful when creating infoboxes, for example. This function uses the entire article written so far to create a series of summary bullet points and insert them into the current text block. This overwrites the content of the currently selected block.
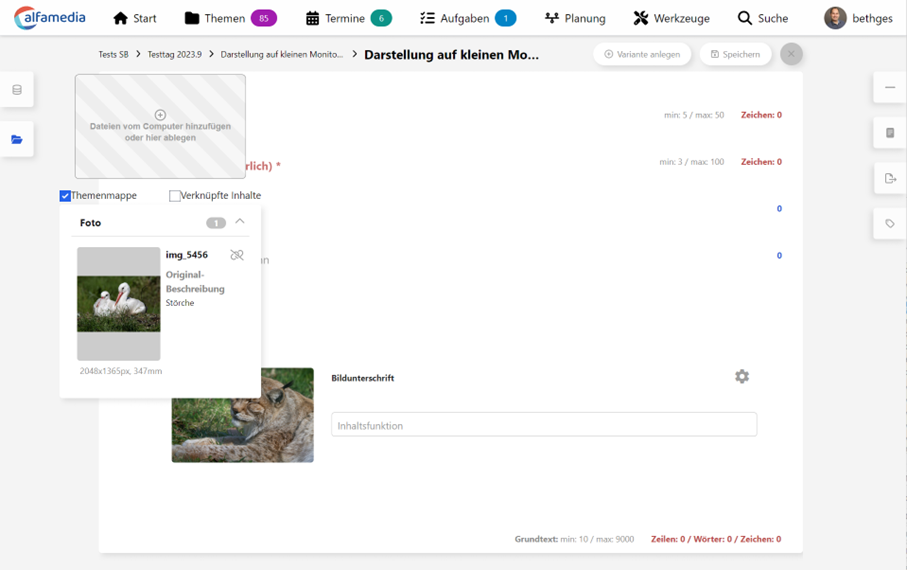
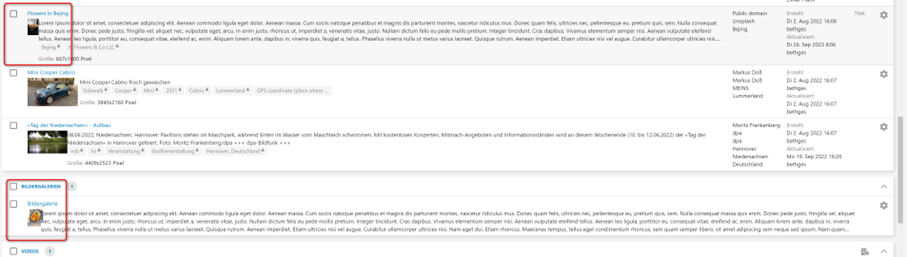
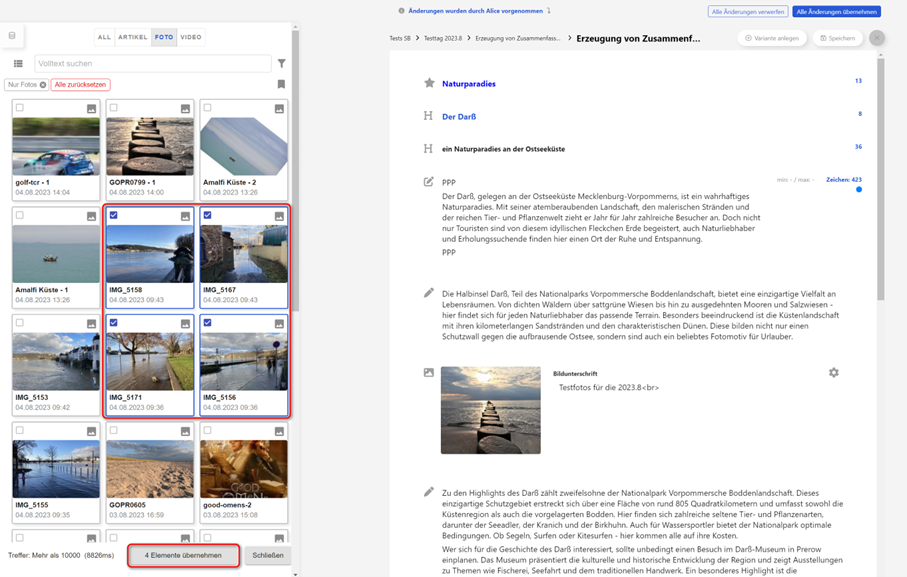
Simultaneous transfer of several images from the media library
In the open article, clicking on the button “Take over content” in the media library now places the selected content directly in the article. Previously, the images were only placed in the topic folder of the article and then had to be transferred manually to the article.
New arrangement of pictures in PrintLayout when saving in EO
If the local_settings parameter REDWEBEXPORTER_FOTOASSIGNMENTS_ON_UPDATE is activated, from now on this will cause images of an article to be rearranged each time they are saved in the Editorial Organiser, as configured via the content function of the image blocks in the article. This means that this also overwrites changes that have been made in Print Layout in the meantime.
This function is only available if the article has already been opened in Print Layout. If this is not the case, further exports with changed image positions are not transferred to Print Layout.
Extensions for the Exporter to WordPress
The WordPress Exporter has been extended with a mapping for text areas and custom fields.
Filtering content functions according to user groups, editorial offices and users
In the administration, you can now set which content functions are to be displayed to which users, editorial offices and groups. If nothing is set here, the content function is displayed to all users.
This is not a restriction of rights for users, but a way of keeping the list of content functions per user clear. It is still possible for the user to set content functions via the backend for which he or she has not been entered in the administration.
Integration of the AI tool “Alice” into the article editor
In the article editor it is now possible to have texts generated, edited or improved by the AI “Alice”. To activate this, you need an OpenAI API key, which must be entered in the administration under System > OpenAI Configuration > API Key. In addition, you can also select here which editorial teams should have access to this API key. If nothing is selected here, all users can use this API key. However, the right “EO_CAN_USE_AI” must also be assigned so that it is possible to exclude individual users.
If you have been authorised by an administrator to use the connection via these settings, the “Alice” icon in the form of a rabbit appears in the toolbar of a text block in the article editor. This menu item is only available in blocks in which the toolbar has also been authorised to be used in this block (configurable via the administration of the corresponding editor template). Clicking on the Alice icon opens a drop-down menu with various commands available for selection:
- Shorten
- Tonality: Positive
- Tonality: Sober
- Fill Block
- User-defined request
Stage 1 of the revision of the content transfer
If text is transferred by content transfer to a variant that already contained text in this block, it was previously only possible to keep both texts by pressing a button. If necessary, the old text had to be deleted manually. For this purpose, there is now a new button “Replace” as well as a button “Replace all with changes”, which deletes old text in a block that was changed by the content transfer.
If a block has been newly added by the content transfer or if the block was empty before the content transfer, there is only one button here, “Apply”, which confirms that the whole block is to be kept as it is.
In the case of newly added blocks, the button “Replace all with changes” tries to determine which existing blocks are to be replaced by the new one. The system searches for old blocks that have not been added by the content transfer but are of the same type (i.e. in the case of a citation block, further citation blocks are searched for; in the case of a basic text block, further basic text blocks are searched for). If these blocks are neither fixed blocks that cannot be deleted nor mandatory blocks that must not be deleted either, they are removed and replaced by the newly added block.
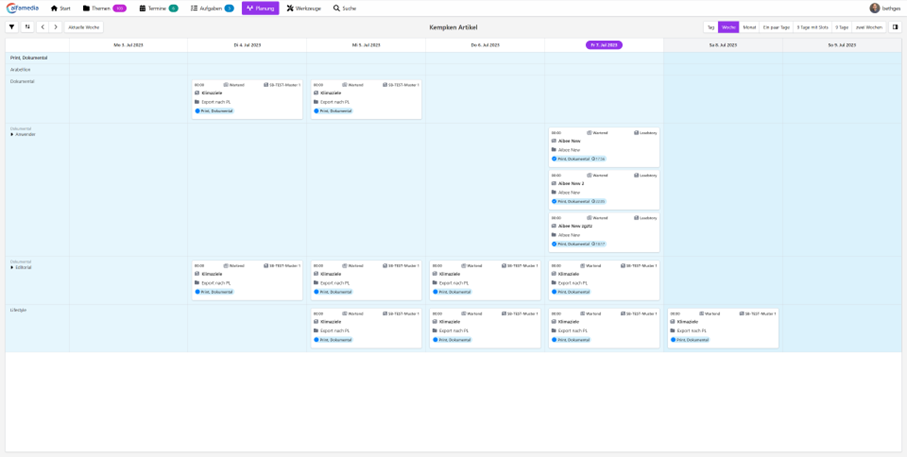
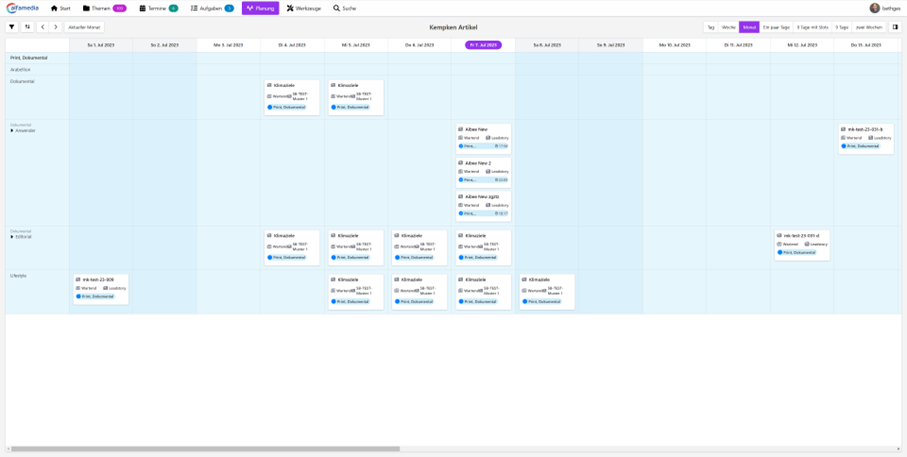
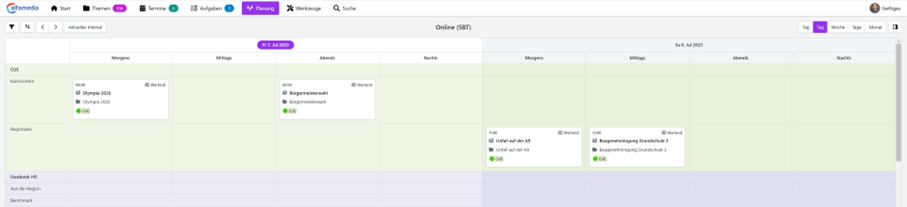
New planning boards
In this release we have made fundamental revisions to improve the user experience. Here are the most important new features:
- Unification of configuration type: from now on there is only one configuration type of planning boards – export channel to departmental configurations. This simplifies usage and enables a consistent way of working.
- Flexible view options: You can now configure different views to best suit your planning boards. Choose between day, week or even month views to keep track of your projects.
- Division of the day views: To map your daily planning even more accurately, we have added the possibility to split day views into any slots. For example, define separate slots for morning, noon, evening and night to optimally organise your tasks and appointments.
- Sorting by publication time: To improve clarity, we now offer you the option to sort the cards of a row by publication time. This way you always keep track of the chronological order of your content.
New planning maps
In this version we have also completely revised the planning maps. It is now possible to define any planning maps that have either a theme or article reference. The contents can be defined absolutely freely via the EO administration. The now defined cards can then be selected and used in the new theme planning. You can thus decide for yourself which content you want to have displayed on the respective planning boards.
or
Labels on planning maps
It is now possible to attach labels to planning cards that you have defined. These labels have no further function for further processing in the system, “except” to store additional information on a planning map. However, this is also the great advantage, because you can define the labels freely according to your wishes and then use them in the system.
DAM – Digital Asset Manager
Searches for yesterday and today now take time zones into account
Until now, search queries for yesterday or today were always based on UTC (universal time). However, this led to the problem that for a user based in Germany, a search for yesterday always included a 1-2 hour offset. This is no longer the case, as the DAM now compensates for this difference and sends requests to servers that take the time zone difference into account.
Note: In order to be able to save the date values correctly in search profiles, DAM from version 2023.9 onwards absolutely requires an Atlas version 2023.9. Search queries that already exist must be opened and saved again for them to work correctly.
Checking out elements also for graphics
As with photos, pages and documents, it is now also possible to check out graphics and check them back in after a change. The right REDWEB_AAM_ALLOW_GRAPHIC_CHECKOUT is required to enable this function.
Photographer search is now more robust
The search via the fixed photographers list no longer filters only the one fixed notation. This means that special drawings are ignored and the order of first and last names is no longer important. Images are now also found if only the first or last name of the photographer is searched for. This makes the search result less clear, but since the metadata in images are rarely linearised, the rigid search has so far usually led to the desired images not being found at all.
Reset search mask to default
If you edit the list of search criteria, you can now use the new button “Reset to default search criteria” to restore the default search criteria. The changes made by resetting are immediately saved in the user profile; only if further changes have been made do they have to be saved by clicking on “Done”.